Using images in content
Optimise images for the web
Optimising images helps pages load faster, reduces data use, and ensures images remain clear and usable for everyone.
Only use images when they help people understand the content or service. Read Before you use images in web content.
On this page
- Why optimise images for our websites
- Factors that affect image file size
- General rules for optimising images
- How to resize and save images
Why optimise images for our websites
Optimising images helps everyone, especially people using screen readers, screen magnifiers or slower internet connections.
Large or uncompressed images slow down web pages, even when the images look small on screen. This is because browsers still download the full-size image file.
Slow-loading images use more data and make websites harder to use on mobile phones, older devices and slow internet connections. This can interrupt reading and make it harder for people to focus on the content.
Some websites do not automatically resize images, so you must optimise images before they are uploaded.
Together, these issues make content harder to use, especially on mobile devices and with assistive technologies.
Optimising images reduces file size without noticeable loss of quality, helping images load quickly and remain clear.
Factors that affect image file size
Three main factors affect image file size:
- Pixel dimensions – the width and height in pixels. For example, 700 pixels wide by 500 pixels high.
- File type – for example, JPG or PNG.
- Compression or quality – how much detail the image keeps when it is saved.
Checking file size, type, and pixel dimensions (Microsoft devices)
You can quickly check file size, type, and pixel dimensions on Microsoft devices.
To check one image:
- Right-click the image file.
- Select 'Properties'.
- Find the file type and size in the 'General' tab.
- Click the 'Details' tab to find pixel dimensions.
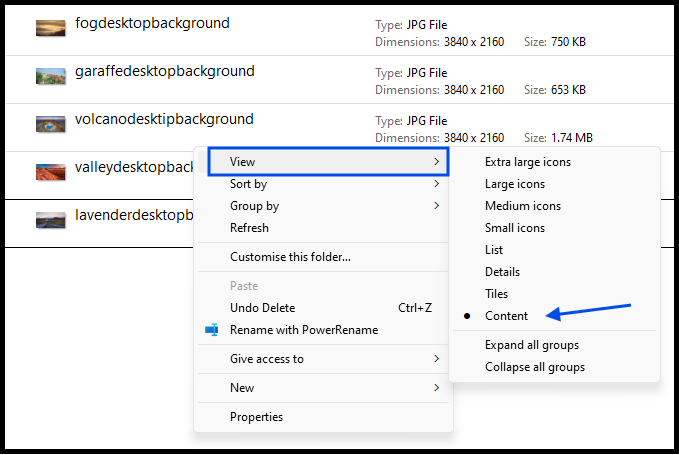
To check multiple images in a folder:
- Open the folder.
- Right-click in the folder.
- Select 'View,' then 'Content'.
This view shows file type, size, and pixel dimensions for each image (see image).
General rules for optimising images
File sizes
Follow these guidelines:
- Large images, such as banners, should be about 400 KB or smaller.
- Smaller images should be proportionally smaller.
File sizes may be shown as:
- 1 byte (B)
- 1 kilobyte (KB) = 1,000 bytes
- 1 megabyte (MB) = 1,000KB (or 1,000,000 bytes)
Even large web images should not exceed 400 KB once compressed.
Pixel dimensions
Width usually matters more than height because it determines how the image fits across a page.
Images that are wider than the page can cause extra scrolling and larger file sizes.
Use these maximum widths for common images:
- 720 pixels for standard images
- 1200 pixels for large banners and hero images
Do not scale up smaller images. This increases file size and causes blurring.
For other website-specific sizes, contact the Communications and Marketing Team
File type
Choose the correct file type for web display.
- Save photographs as JPG.
- Save images that need transparency or have sharp lines as PNG (for example, logos, diagrams, and banners).
If a JPG looks clear and is smaller than a PNG, it is acceptable to use.
Compression or quality
Reduce file size without losing visual clarity:
- As a guide, save JPGs at around 50% quality for photographs.
- Save JPGs at up to 80% quality for images with text or fine details.
This can reduce file size significantly without visible loss in quality.
PNGs do not have adjustable quality settings.
Make image information available to everyone
After optimising an image, always check that the information it contains is accessible to everyone.
Before uploading, ensure images can be understood by all users.
If an image does not load or is slow to load, people must still be able to understand the content and complete their task.
- Include alternative text for informative images so screen readers can describe them.
- Explain complex images in nearby page text when the information is too long for short alt text.
- Mark decorative images so screen readers ignore them.
Optimised images should load quickly, stay clear, and not prevent people from understanding or using the content.
How to resize and save images
Use the Microsoft Photos app to resize images for web. Follow these steps:
- Open the image in Microsoft Photos
- Click the three dots and select 'Resize image'.
- Link width and height to avoid distortion
- Resize width as needed (do not scale up small images)
- Select 'JPG' or 'PNG'.
- If JPG, set quality: 50% for photos, up to 80% for logos or text
- Click 'Save'.
Learn how to resize images for web (Microsoft Photos app) [YouTube, 1 minute]